Profiler for JobRoller
The Idea for the plugin is to make profiler page for JobRoller jobs poster users to display attractive web page by adding multiple header banners, contact details like phone number, email address and social icons like Facebook, twitter, google+ ….
Set company logo or company title text to make web page more real useful. The content settings will allow user to display about company details, short description about company by welcome text and descriptions, add images an HTML content to add HTML decorated content.
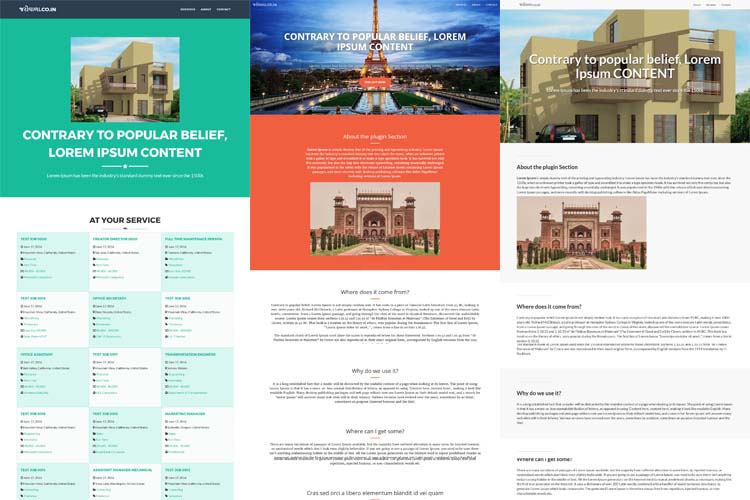
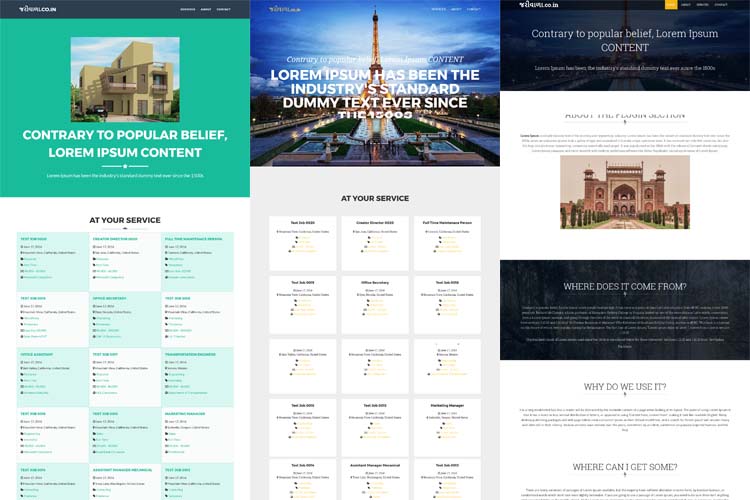
SEO settings to make profiler page more useful and meaningful for search engines. Provided attractive templates with modern style and design to display profiler page decorated and good look for visitor users.
Significant Features
- Create and set different job profiler pages.
- Attractive profiler page design.
- Display Banners, About contents and contact details.
- Contact details with social media like Facebook, twitter, google+…..
- New menu links added in sidebar on edit profile page.
- Manage profiler details from edit profile page
- Basic Settings
- Content Settings
- SEO Settings
- Menu Settings
- Template Settings
- Check Your Page (view poster profile on front end)
- Admin Settings:
- Profiler Templates settings
- General settings
- Email settings
- Display settings
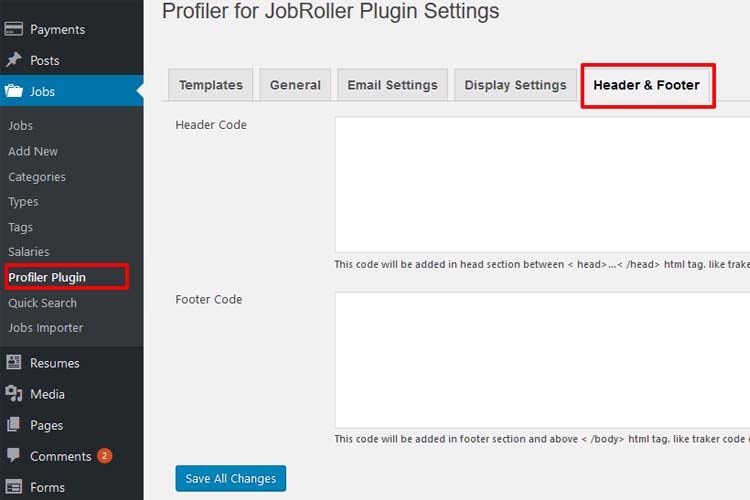
- Header & Footer settings
Admin Settings
-
- Admin should upload and install the plugin properly. Please refer installation guide for more details.
- Select templates for profilers.
- MOST IMPORTANT AFTER PLUGIN ACTIVATION :: Reset permalink from wp-admin >> Settings(left menu) >> Permalinks >> Permalink Settings >> press “Save Changes” button and it will reset profiler settings automatically.
- Check profiler url settings from wp-admin >> Jobs(left menu) >> Profiler Plugin >> General >> check “Profiler Base URL”
- Check permission settings from wp-admin >> Jobs(left menu) >> Profiler Plugin >> General >> check “Permission settings” — to enable/disable edit profiler data
- Create new blank page for profiler and set from wp-admin >> Jobs(left menu) >> Profiler Plugin >> General >> select for option “Profiler Page”
- Create new page for edit profile for profiler’s data manage from wp-admin >> Pages >> Add New — Set title like : “Edit Profiler”.
Or Normally it generated automatically while plugin activated but if not generated, do generated manually.
- Plugin settings from wp-admin >> Jobs(left menu) >> Profiler Plugin >> Plugin Settings
- Manage Templates –> to enable templates for profiler plugin and set default.
- General Settings –> plugin settings like profiler template page, edit profile page, profiler URL, wrong profiler redirection settings, additional CSS…….
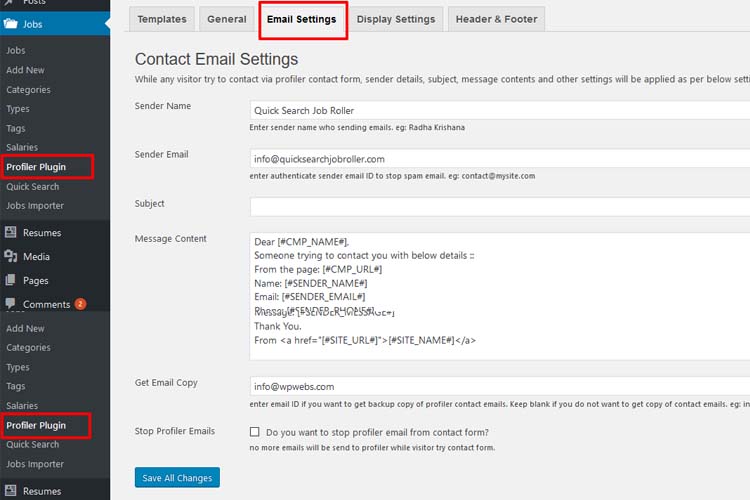
- Email Settings –> Contact email sent from profiler page related settings like: Sender Name,Sender Email, Subject, Message Content …….
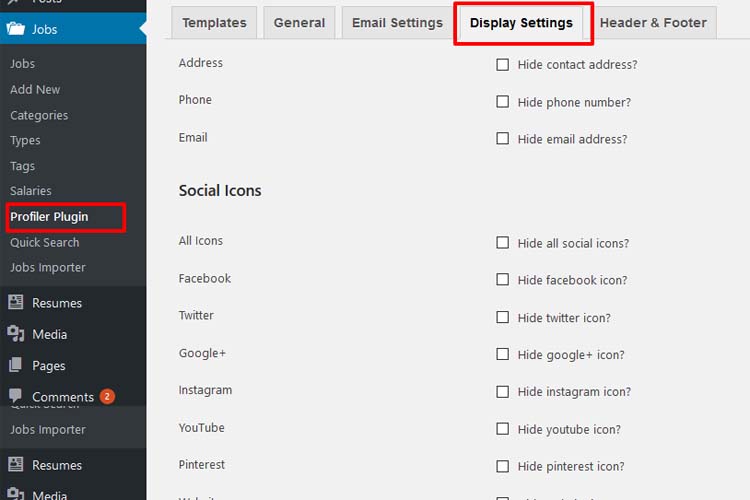
- Display Settings –> address,phone,email, social icons display settings.
Profiler User Guide
- If user can see the “Profiler Options” menu box on dashboard/edit profile page
- the user is allowed to manage profiler page.
- User can see ::
- >> Basic Settings,
- >> Content Settings,
- >> SEO Settings,
- >> Menu Settings,
- >> Template Settings and
- >> Check Your Page
Profiler on Front end User Guide
- If profiler has access permission as per admin “Permission settings” and profiler not disabled, then only profiler can see manage profiler options.
- First time profiler page generator user without any access permission, cannot create own profiler page.
- Because logged in user have to add profiler link to create own profiler page, without profiler page link no one can create profiler page.
- So if profiler page created, without access permission user cannot manage own data or change it.
- That means any user changed the permission after profiler page generated, they cannot manage profiler date but profiler page will be published with no future update.
- See profiler stetting links on poster dashboard(edit profile) page sidebar.
- The most important is “Profiler URL”, if profiler url is added then only profiler page will be created and display.
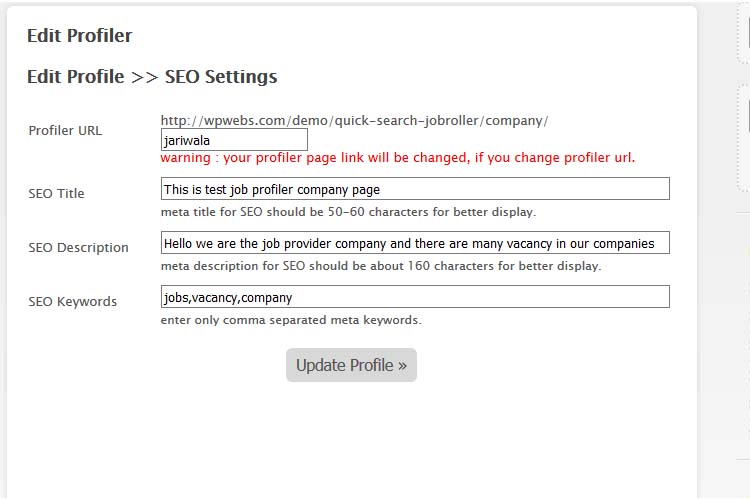
- Fist of all go to “SEO Settings”
- >> The most important is “Profiler URL” — then only profiler page will be created.
- >> make sure that the “Profiler URL” is unique for all profiler and it should never duplicate.
- >> If you try to add duplicate profiler url name, it will never changed.
- >> Set SEO title, description, meta keywords…
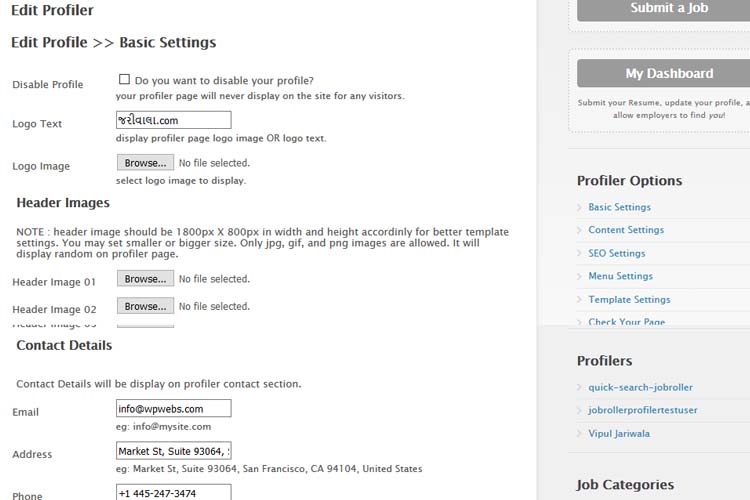
- Set “Basic Settings”
- >> Enable or disable profiler page
- >> Set logo text OR logo image
- >> Upload multiple header images which display randomly on the page
- >> Contact Details, public email, address, phone …
- >> social media settings like :: Facebook, twitter, google+, Instagram, YouTube, Pinterest….
- Set “Content Settings”
- >> Welcome text and content settings
- >> About title and content settings
- >> Content 1 title and content settings
- >> Content 2 title and content settings
- >> Content 3 title and content settings
- >> Content 4 title and content settings
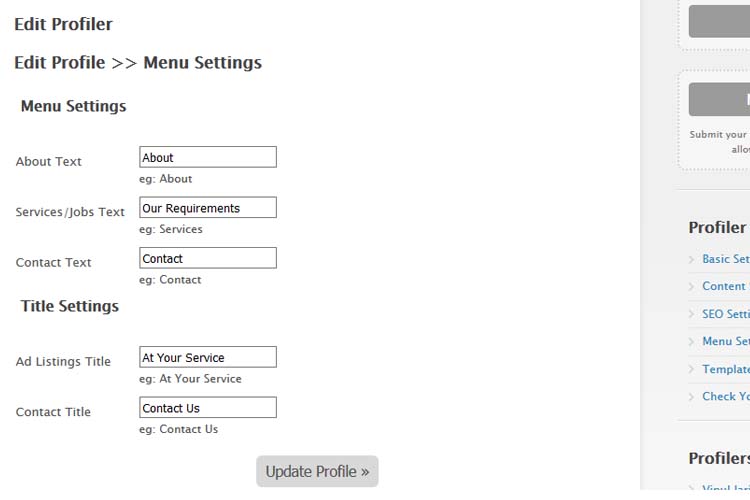
- Set “Menu Settings”
- >> Manage menu titles like About Text, Services/Jobs Text, Contact Text….
- >> Title Settings like Ad Listings Title, Contact Title…..
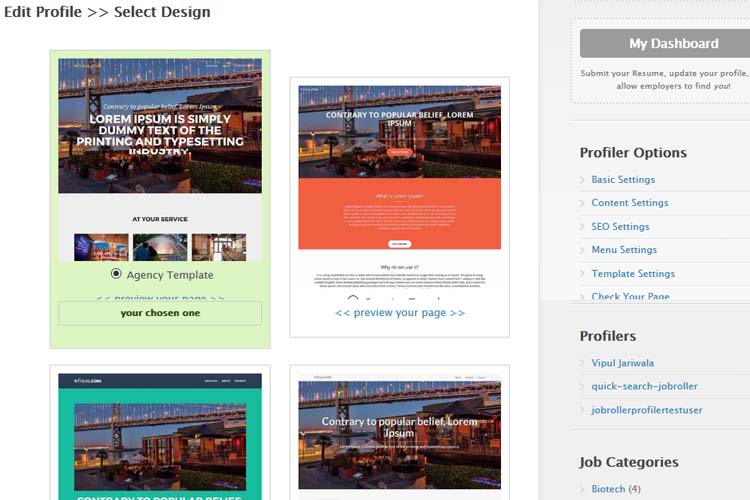
- Set “Template Settings”
- >> select your favorite template for profiler page…
- >> See preview before select or finalize your profiler page. Make sure that the “Profiler URL” is unique for all profiler and it should never duplicate.
- How to enable media upload if now display on profiler manage settings??
>> wp-admin >> Jobs(left menu) >> Profiler Plugin >> General >> Media Upload settings
New Features Update after version : 1.0.1 (31th Oct 2017)
— Profiler link display for author page & job detail page sidebar – not working – Problem SOLVED
— Slider Effect for necessary sliders added and now profiler slider is more attractive.
— Delete profiler header & logo images if any one delete.
Q :: Who can set profiler?
A :: Any logged-in user can if they can see profiler settings on dashboard page sidebar menu and they can set profiler page.
Q :: How to set profiler?
A :: See profiler settings on dashboard page sidebar menu and see settings. The most important is “Profiler URL”, if profiler url is added then only profiler page will be created and display.
Q :: How to change profiler URL?
A :: On dashboard page sidebar menu >> SEO Settings >> set “Profiler URL”.
Q :: How to set SEO for profiler page?
A :: On dashboard page sidebar menu >> SEO Settings >> set ” SEO Title “, ” SEO Description ” and ” SEO Keywords “.
Q :: How to set disable profile?
A :: On dashboard page sidebar menu >> Basic Settings >> select “Disable Profile” and your profiler will never display on front-end website for any visitors.
Q :: How to set Logo Text?
A :: On dashboard page sidebar menu >> Basic Settings >> set “Logo Text”.
Q :: How to set Logo Image?
A :: On dashboard page sidebar menu >> Basic Settings >> select and upload “Logo Image”.
Q :: How to set Header Image?
A :: On dashboard page sidebar menu >> Basic Settings >> select and upload “Header Image”. header image should be 1800px X 800px in width and height accordingly for better template settings. You may set smaller or bigger size also.
There are multiple header images upload options and those images will display randomly if more than one image uploaded.
Q :: How to set contact details like Email, Address and Phone?
A :: On dashboard page sidebar menu >> Basic Settings >> Contact Details >> Email, Address and Phone.
Q :: How to set social media settings?
A :: On dashboard page sidebar menu >> Basic Settings >> Social >> Facebook ID, Twitter ID, Google+, Instagram, YouTube and Pinterest.
Q :: How to set welcome title and content?
A :: On dashboard page sidebar menu >> Content Settings >> Welcome Text >> ” Title ” and ” Content “.
Q :: How to set about title and content?
A :: On dashboard page sidebar menu >> Content Settings >> About Section >> ” Title ” and ” Content “. also you can set “Content 1 Section”, “Content 2 Section”, “Content 3 Section” and “Content 4 Section”
Q :: How to set menu title?
A :: On dashboard page sidebar menu >> Menu Settings >> Menu Settings >> ” About Text “, ” Services/Jobs Text ” and ” Contact Text “.
Q :: How to set contact title on the page?
A :: On dashboard page sidebar menu >> Menu Settings >> Title Settings >> ” Contact Title “.
Q :: How to set jobs listing title on the page?
A :: On dashboard page sidebar menu >> Menu Settings >> Title Settings >> ” Job Listings Title “.
Q :: How to select profiler page design?
A :: On dashboard page sidebar menu >> Template Settings >> select your favorite template. Before select your template you may like to see the prview of your profiler page.
Q :: What to do if profiler page on front end not display?
A :: You should reset permalink from wp-admin >> Settings(left menu) >> Permalinks >> Permalink Settings >> press “Save Changes” button and it will reset profiler settings automatically.
Q :: How to change profiler base url (which is company by default)?
A :: Go to wp-admin >> Jobs(left menu) >> Profiler Plugin >> General >> check “Profiler Base URL”
–> If you want to changed it or set you must reset permalink settings.
–> How to set permalink settings ?? from :: wp-admin >> Settings(left menu) >> Permalinks >> Permalink Settings >> press “Save Changes” button and it will reset profiler settings automatically.
Q :: How profiler cannot see manage profiler settings options?
A :: On plugin settings there is access permission option and if profiler membership match with that settings, then only profiler can see and manage settings.
Q :: Why cannot see edit profiler page while click on the link?
A :: Make sure that “Edit Profiler” page is generated with page template — “Edit User Profile – CP Profiler”. Check that from wp-admin >> Jobs(left menu) >> Profiler Plugin >> Plugin Settings >> General >> see the option “Edit Profile Page” — from where you can manage it.
Q :: How to enable media upload if now display on profiler manage settings??
A :: You should manually enable/disable media upload for your profiler user permission from wp-admin >> Jobs(left menu) >> Profiler Plugin >> General >> Media Upload settings
Q :: How to find last updated user profile?
A :: Download below plugin and you can see modified date on wp-admin >> Users (left menu) >> Users list — which help you to get last updated profile.
https://wordpress.org/plugins/user-last-modified/
1) Unzip the plugin folder
2) Copy the plugin folder and paste in “wp-content/plugins/”
======= OR =======
Get the help link how to install plugin from wp dashboard or via FTP :: http://wpwebs.com/blog/install-a-plugin-using-the-wordpress-admin-plugin-upload/
3) Go to wp-admin -> Plugins -> Plugins -> Profiler for JobRoller Plugin -> Active Plugin
4) Plugin settings link will be added from wp-admin >> Jobs(left menu) >> Profiler Plugin >> Plugin Settings
–> Manage Templates –> to enable templates for profiler plugin and set default.
–> General Settings –> plugin settings like profiler template page, edit profile page, profiler URL, wrong profiler redirection settings, additional CSS…….
–> Email Settings –> Contact email sent from profiler page related settings like: Sender Name,Sender Email, Subject, Message Content …….
–> Display Settings –> manage content like address, phone, email address and social icon settings. Either show/hide.
–> Header & Footer –> add tracking code or any script code or any thing in header and footer section.
MOST IMPORTANT ::
————–
–> Reset permalink from wp-admin >> Settings(left menu) >> Permalinks >> Permalink Settings >> press “Save Changes” button and it will reset profiler settings automatically.
5) Create new page from wp-admin >> Pages >> Add New — Set title like : “Profiler Page”.
–> Go to wp-admin >> Jobs(left menu) >> Profiler Plugin >> General >> select for option “Profiler Page”
–> This page is for front end profiler web page display.
6) Create new page from wp-admin >> Pages >> Add New — Set title like : “Edit Profiler”.
–> On add/edit page >> add short-code “[jobroller_profiler_edit]” in content section.
–> Go to wp-admin >> Jobs(left menu) >> Profiler Plugin >> General >> see the option “Edit Profile Page” — from where you can manage it.
–> This page allow front end login-ed in user to manage profiler data related setting.
–> This page generated automatically while plugin activated. If not generated, you should create manually as per above.
7) Go to wp-admin >> Jobs(left menu) >> Profiler Plugin >> General >> check “Permission settings”
–> Set the user permission as per you want.
–> Default allow to create profiler page for all users.
–> You may disable.
–> This option will enable/disable the front end user’s edit profiler settings.
–> First time profiler page generator user without any access permission, cannot create own profiler page.
–> Because logged in user have to add profiler link to create own profiler page, without profiler page link no one can create profiler page.
–> That means any user changed the permission after profiler page generated, they cannot manage profiler date but profiler page will be published with no future update profile data.
8) Go to wp-admin >> Jobs(left menu) >> Profiler Plugin >> Plugin Settings >> General >> check “Profiler Base URL”
–> If you want to changed it or set you must reset permalink settings.
–> By default is it ” company ”
–> How to set permalink settings ?? from :: wp-admin >> Settings(left menu) >> Permalinks >> Permalink Settings >> press “Save Changes” button and it will reset profiler settings automatically.
7) Read Usage, Notes & Developer Notes Carefully.
You can contact us directly via email (info(@)wpwebs.com).
Version : 1.0.4 (19th Nov 2020)
——————————-
— Edit profiler shortcode was create warning, problem solved.
Version : 1.0.3 (29th May 2018)
——————————-
— Last security update, users cannot post new ad, problem solved.
Version : 1.0.2 (28th May 2018)
——————————-
— Major Security Update :: profiler users can see edit page links on website content pages — Problem SOLVED
— After this update, only administrator and editor can manage and see the edit page link on front-end website.
— Reset “Media Upload settings” from plugin settings after this update.
Version : 1.0.1 (31th Oct 2017)
——————————-
— Profiler link display for author page & job detail page sidebar – not working – Problem SOLVED
— Slider Effect for necessary sliders added and now profiler slider is more attractive.
— Delete profiler header & logo images if any one delete.
Version : 1.0.0
——————————-
New Release









Comments (9)
Hi.
Will this work with child themes..?
Specifically Jobster.
Yes it is working for almost child theme, only problem may be to display profiler link button on job detail page in case of JobRoller action hook may not added for child theme single page. Otherwise there is no problem with child theme. In such case we just add original action hook of JobRoller theme in single page and it will work without any problem.
Hi.
How does charging for this work?. Can you charge each job lister per month / week to have page and post jobs on it?.
No this is the profiler page which is generated by job poster. There is no charge for that right now. By default it will generated for all job posters. Job company should login and manage it from manage profiler page of front end. You may see from demo site.
Thanks
Oh ok shame.
I was thinking you could charge higher amount for page hire for certain amount of time compared to job lister making many single listings totalling more.
We can allow paid charge if there is membership facility for registration. Even if integrated with good membership plugin, it will very helpful. So We are searching good & free membership plugin which should work with this theme and so we can use it’s membership support and continue allow paid or free membership and related features. If you have idea/using good free membership plugin, you may give us idea to make it easy.
Thanks
Thank you.
I think it should be chargeable to have otherwise why have it if they can post on page for free?
Let me know when you have a solution and I will purchase.
Hi i have problem:
Warning: Illegal string offset ‘shortcode’ in /autoinstalator/wordpress25/wp-content/plugins/profiler_jobroller/jr_profiler_settings.php on line 104
Hi there,
Yes it is variable initialize related warning and you should ignore it.
We will check related warnings and update plugin very soon.
Thanks