Ad Opportunities
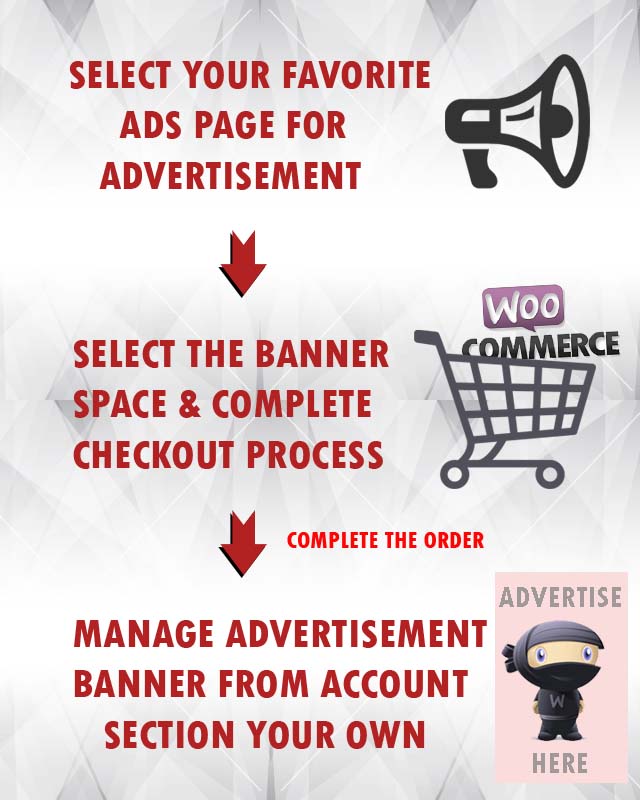
Banner advertisement to maximize your ad revenue from visiting users. The plugin allow registered users to select & add the advertisement banners and/or advertisement script like Google Ads, Video embed etc. Site admin can manage, change, and remove from wp-admin easily.
The WooCommerce Plugin should be installed if you want users to purchase the banner space from front side.
Site admin can manage banner spaces to be display on front end via plugin settings page from wp-admin. We have added maximum possibility of display advertisement via the plugin and easily show/hide by plugin settings.
Display banners for each individual pages (eg: home page, each category & tags pages, ads, blog post and content detail pages ).
If you have 100 pages on your site so you have possibility to display ads is 100 multiply by the banners spaces you have selected.
Just like if you have selected above & below header banner, above & below footer banners & above and below sidebar banners so total is 6 banners.
So now you have total banner spaces to buy for users is 100 multiply by 6 (100 x 6) equal to 600 banners you can display for you complete site.
Of cause the banner position value(price) will be common for all 100 pages like if you have create a product for $10 and selected for above & below header, for whole ads detail pages while any buyer going to buy the ads banner space he will charged $10 only.
Like wise if you want different banner space price for above & below footer, you should create new product and manage settings from plugin settings to charge the price as per you decided.
Initially the plugin have common price selection and settings options.
Like currently there is only one option to display default banner on above header space for whole site. Same way all other options are same so price value for all pages for particular banner space will be common for whole site.
So if the plugin is on demand, that time we will plan to add different settings options for home pages, listing pages and detail pages. So the site owner can change the banner space price for home page, listing pages and detail pages.
Significant Features:
- Banner Advertisement to maximize your Ad revenue.
- Display banners for each pages.
- Users to buy banner space via WooCommerce Plugin.
- Banner space charges managed by admin.
- Individual banner size settings. eg: different width X height for each space as per required.
- Different Banner spaces for pages.
- Admin can see the orders(revenue) and manage report (like all features of WooCommerce).
- Admin can set the default advertisement if there is no banner to display.
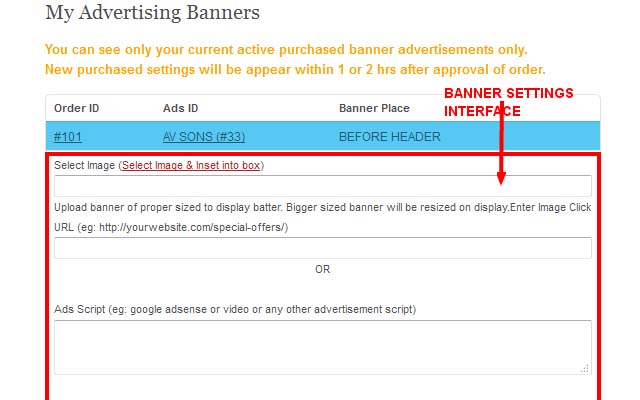
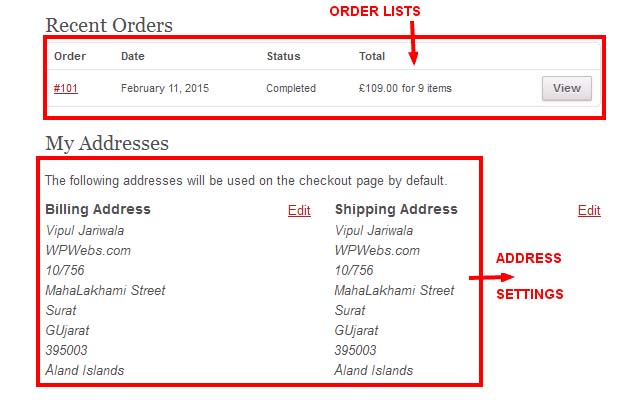
- As soon as order approved user can manage the advertisement banner from “My Account” page.
- Cron job feature to refresh new banners and expired banner management automatically.
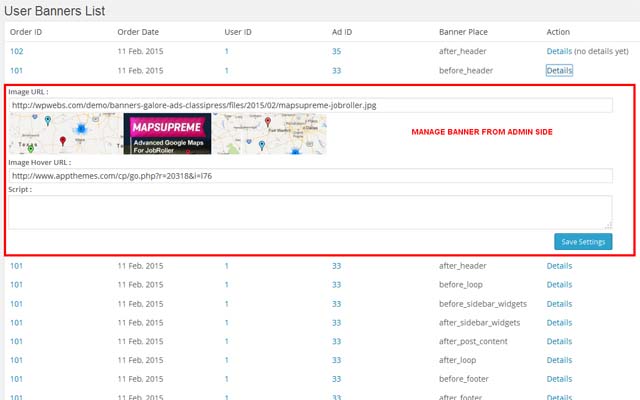
- Admin can manage or change user banners and all…
- Expiry days settings for each banner spaces.
- Display multiple banners on same space buy sliding effect.
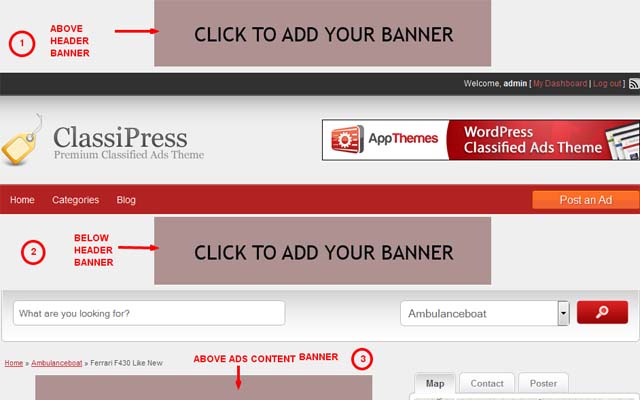
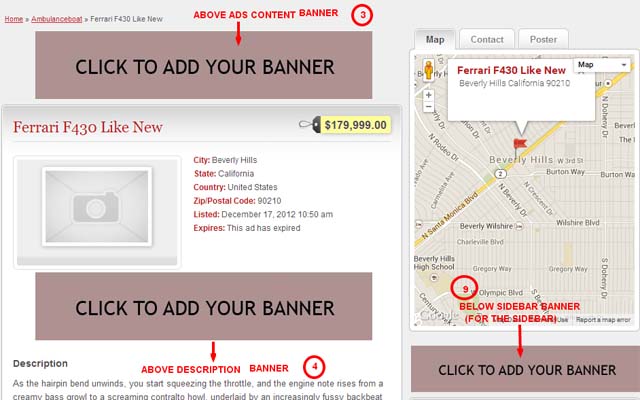
- Banner spaces for different places like Above & Below Header, Beside logo, Above & Below Footer, Above & Below Content area, under comments section… See the screen image of plugin settings of more details
- Image media uploaded and selection for front end users.
- Compatible with ClassiPress 3.2.0+
- Compatible with WooCommerce 2.0.0+
Q. What is difference between Banner galore Plugin and Ad Opportunities with WooCommerce(current plugin)?
A. Banner galore plugin can be managed by admin only while current plugin can be managed banners either by admin or visiting users can buy it and manage.
— This plugin is useful only site owner who want users to give facility to buy banners spaces and earn money.
Q. Key Featured in Banner Galore Plugin (older classipress banner plugin)?
A. Banners can be display for whole site. Like home page, blog pages, category listing pages.
— Main features is : display banners between sequential ads (banners between listing display) on ads listing for search page, category listing, home page etc…
— These features are not included in current plugin.
— Widget for sidebar to display any number of banners in sidebars.
— Easily display site banners as per suitable for site by admin.
— Admin can manage common banners for all categories, listings, home page…
— While for current plugin user have to buy the banner space for each individual pages.
— it will work for personal advertisement system or limited amount of advertisement on the site.
Q. Key Features in Ad Opportunities with WooCommerce(Current Plugin)?
A. Banners can be display for each individual pages like home page, each listing pages & detail pages.
— Users can buy and manage banners their own from my account settings.
— Cannot add sequential banners for category listing as per older plugin settings. (banners between listing display)
— WooCommerce plugin should be work properly on your site for allow users to purchase banner spaces.
— More than one banner on same banner space by sliding effect.
— Earn money buy banner spaces.
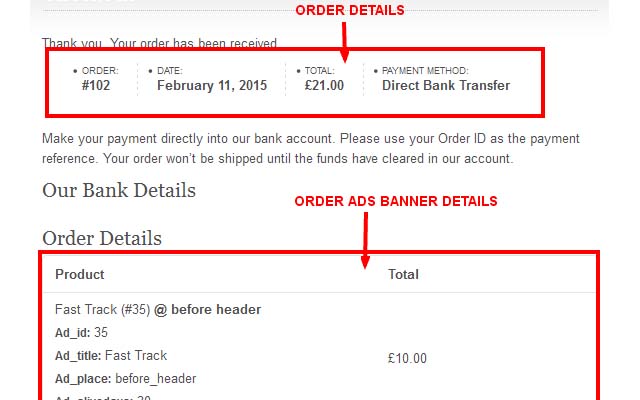
— Once order approved, banner space will be activated on user account after one hour by cron job process.
— No headache to manage banner and payment.
— No limitation of advertisement.
Q. Any special requirement?
A. The plugin work with WooCommerce plugin
–it is require that the WooCommerce plugin should work for your site
–So first you should try to install the WooCommerce plugin.
–BECAUSE WooCommerce plugin require “SESSION” enabled and many shared hosting company not enabled so you first confirm that.
Q. No refund in case of WooCommerce not working for your site.
A. Because WooCommerce plugin require SESSION enabled and many shared hosting company not enabled so you first confirm that WooCommerce is working for your site as it is free plugin from http://wordpress.org/
1)Unzip the ad_opportunities_with_woocommerce.zip folder.
2)Copy the plugin folder “ad_opportunities_with_woocommerce” and paste in “wp-content/plugins/”.
======= OR =======
3)Go to wp-admin -> Plugins -> Ad Opportunities with WooCommerce for Classipress -> Active Plugin.
4)Go to wp-admin > Ads(Left menu) > Ad Opportunities Settings > Make settings as per want to display advertising banners & set default banner for users.
5)Install Woocommerce Plugin so registered users can purchase the banners spaces, place the order & complete the payment if you are going to charge.
6) See the screen image attached with the plugin folder to have visual help what to do.
==========================================
Detail Installation Guide
==========================================
———————–
Ad Opportunities Plugin Settings
———————–
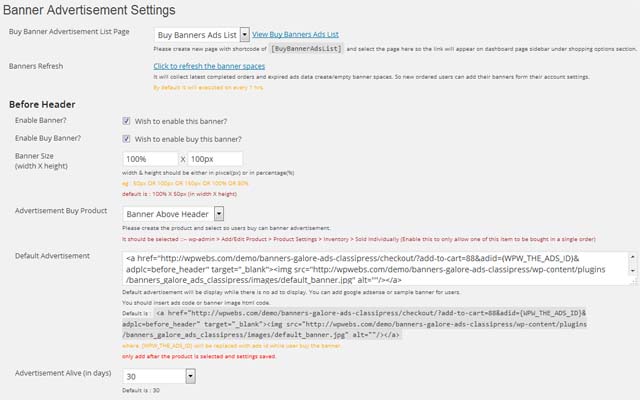
— Go to wp-admin > Ads(Left menu) > Ad Opportunities Settings > Make settings as per want to display advertising banners & set default banner for users.
— From where
— You can enable/disable the Banner Spaces
— Enable/Disable the Banner Spaces to buy for registered users
— Manage banner size (height & width)
— Manage advertisement price by select the product (you should create product and select WooCommerce settings)
— Create product with prize = 0 for free spaces
— Set Default Advertisement while there is no banner ads from users
— Set the advertisement alive days, default is 30.
— The banner spaces data managed by cron job automatically (cron job will be executed on every 1 hr).
— Comma separated ads, post and page Ids on which page you want to block/hide banners space.
— Admin can manually run the cron job from plugin settings page.
— Admin can manage add/edit banner image, URL and advertisement script.
— Admin can change alive days by edit the order & order product attributes.
———————–
WooCommerce Settings
———————–
— Important settings are require while you creating new product for this plugin settings.
— Create new product and add title and image if you want.
— Add price as per you decided and the buyer will charged as per product amount added.
— On product add/edit page >> Under “Product Data” settings >> “Inventory” section >> You should select “Sold Individually” — For add only one one banner ads to buy
— The important point is :: more than one banner on same banner spaces for single order are not allowed. Because banner data are stored with variable name of order_id, ads id and ads place combination variable.
— So if any one need to display more than one banner ads for same place, he must place different orders.
— If order placed with more than one item with one place of ads then it will consider as only single banner space and other order details will be ignored.
— Add Product price as normal WooCommerce product, while you add the product.
— On “Publish” section(right side) >> Catalog visibility >> you should select “Hidden” to do not display the product anywhere on the site.
— If you have activated the wooCommerce shop, those products are never display any where to any users.
———————–
Users Settings (Dashboard(ClassiPress) >> My Account(WooCommerce))
———————–
— Go to Dashboard of Classipress theme.
— The links from Dashboard > Sidebar > Shopping Options will be added for wooCommerce.
— Once the order completed(approved), user can see the manage banner section option under My account settings.
— From where user can add/edit like manage the advertisement banners.
— User can select & upload own advertisement banner image and link url.
— OR same way add your script for advertisement (the code never added JavaScript code and code with iFrame for security purpose).
— In place user can add own html code like links, descriptions and any thing with basic html code only.
— The banner advertisement data refresh after ever 1 hr it will add new completed order spaces and remove expired banner orders settings.
5)Install Woocommerce Plugin so registered users can purchase the banners spaces, place the order & complete the payment if you are going to charge.
6) See the screen image attached with the plugin folder to have visual help what to do.
You can contact us directly via email (info(@)wpwebs.com) or support under forum in the AppThemes forum.
The WooCommerce plugin should be installed if you want registered users to purchase the banner spaces from front side otherwise it will not allowed user to purchased.
Plugin Usage & Description
————————————————-
IMPORTANT NOTE ::- The plugin will display the advertisement banners only for Single detail pages(like: ads,blog post and content pages) not for any other pages like ads listing pages or Home page, etc…
— Active the WooCommerce Plugin.
— Ad Opportunities with WooCommerce for Classipress Plugin.
Banner Setup in three different steps
———————–
Ad Opportunities with WooCommerce Plugin Settings
———————–
— Go to wp-admin > Ads(Left menu) > Ad Opportunities Settings > Make settings as per want to display advertising banners & set default banner for users.
— From where
— You can enable/disable the Banner Spaces
— Enable/Disable the Banner Spaces to buy for registered users
— Manage banner size (height & width)
— Manage advertisement price by select the product (you should create product and select WooCommerce settings)
— Create product with prize = 0 for free spaces
— Set Default Advertisement while there is no banner ads from users
— Set the advertisement alive days, default is 30.
— The banner spaces data managed by cron job automatically (cron job will be executed on every 1 hr).
— Comma separated ads, post and page Ids on which page you want to block/hide banners space.
— Admin can manually run the cron job from plugin settings page.
— Admin can manage add/edit banner image, URL and advertisement script.
— Admin can change alive days by edit the order & order product attributes.
———————–
WooCommerce Settings
———————–
— Important settings are require while you creating new product of this plugin.
— Create new product and set for settings.
— Add price as per you decide and the buyer will charged as per product priced.
— On product add/edit page >> Under “Product Data” settings >> “Inventory” section >> You should select “Sold Individually” — For add only one one banner ads to buy
— Because more than one banner on same banner space are not allowed for single order. Because banner data are stored with variable name of order_id, ads id and ads place combination variable.
— If order placed with more than one item with one place of ads then it will consider as only single banner space.
— Add Product price as normal WooCommerce product.
— On “Publish” section(right side) >> Catalog visibility >> you should select “Hidden” to do not display the product anywhere on the site.
———————–
Users Settings (Dashboard(ClassiPress) >> My Account(WooCommerce))
———————–
— See the links from Dashboard > Sidebar > Shopping Options.
— Once your order completed(approved), you can see the manage banner section option under My account settings.
— The banner advertisement data refresh after ever 1 hr it will add new completed order spaces and remove expired banner orders settings.
— You can select & upload banner with your advertisement image and link url
— or same way add your script for advertisement (the code never accepted with JavaScript code and code with iFrame).
Display all ads list Page via Shortcode
———————–
Shortcode:: [BuyBannerAdsList]
— To display the list of all ads for user to buy the banner spaces.
— It will display all the ads pages there are public in your site so user can see it an buy ads as per they want.
— The shortcode will display pagination if ads are more than 100
— That’s all
Version : 1.0.6 (22nd April 2019)
——————————-
— Dashboard sidebar plugin links not display properly for child theme – Problem Solved.
Version : 1.0.5 (06th April 2019)
——————————-
— Solved many php notice/errors.
— Added new shortcode for site uses to allow easily display buy button page like category pages, tag pages and blog related pages.
Version : 1.0.4 (04th Feb 2019)
——————————-
— Banners display before & after content also display for home page blog post list – problem SOLVED
— Now the content before & after content will display only on detail (single) page not listings and other pages.
Version : 1.0.3 (01st Jan 2019)
——————————-
— SSL enabled but not work for some server, problem solved.
— Plugin updated as per ClassiPress version 4+
— Removed PHP notices
Version : 1.0.2 (28th-June-2016)
——————————-
— Banners Add/edit page descriptions changed for create new product from wooCommerce.
— It should be selected ::– wp-admin > Add/Edit Product > Product Settings > Inventory > Sold Individually (Enable this to only allow one of this item to be bought in a single order)
— It should be virtual product by ::- wp-admin > Add/Edit Product > Product Settings > “Product Data” should be “Simple Product” and “Virtual” should be selected otherwise it will ask for shipping on checkout page.
Version : 1.0.1
——————————-
— added multiple language support
Version : 1.0.0
——————————-
New Release







Comments (39)
Hi Vipul,
I already read your demo/documentations. For clarifications and confirmation.
(1) Is it fully compatible with classipress 4+?
(2) If wooclassify is installed, is it compatible with wooclassify?
(3) Does it include the front-end page (or) message displaying which specific banner will expire when/what time?
(4) If the visitors switch on another language at the front-end, will the banner visibility change? (i.e. will they see the same banner ad?)
(5) Can the admin set a DIFFERENT price for each banner from the back-end?
Thank you for your time.
Hi Vipul,
Thank you for your reply. Regarding the (3) point, there is a misunderstanding… I was referring to the front-end page (or) message that is displayed to “all the POTENTIAL ad banner buyers” (NOT referring to the buyers/users who already purchased the banner ad). That way, if someone (potential buyer) wants to buy the banner ad, he/she can know when the specific banner ad will expire and when to buy…..Thank you.
“(3) Does it include the front-end page (or) message displaying which specific banner will expire when/what time? ”
==> Actually the Customer/user from front end can see the banner order, submission and expiry date, and manage banner from dashboard…… with order details like payment details and all…. You can see screen image for more detail about that…
Hi,
(1) If a banner at a specific place already has the ad purchased and posted by someone,
can another person post the banner ad at the same place?
(2) An ad should have the expiration date displayed to all the visitors of the website. In that way, the visitors/users who want to purchase the ad can know when they can post an ad…..Single Ad listing at classipress shows the expiration date of the ad….So Ad opportunites plugin should have the same kind of ad expiration display feature…
Hi zingyixiu,
1)Yes user can purchase more than one banner for one place.
2) The expiry date will display as per purchase by banner owner and admin only not to all. Because ads display individual page not like banner.
Thanks
Hi,
Not understanding clearly.
Were you saying that more than one ad can be displayed AT the SAME BANNER PLACE and AT THE SAME TIME by different buyers of the banner ads? For example, if one banner ad buyer posts an Ad at one banner place, can a different buyer post a different ad AT THE SAME BANNER PLACE at the SAME TIME?
If so, how many ads can be displayed at ONE BANNER PLACE?
Thanks.
Hi zingyixiu, Yes you can add more than one banner for one place. Actually there is not limit of how many banners to display but you should add 3-4 banners at one place to display properly. Otherwise may be design not display better.
Thanks
Hi, thank you for your kind reply.
If there are 3-4 or 5 banner buyers placing their ads at the same time, it is going to cause the problem for the site. If that is the case, do you have a system in place that does not allow the purchase of the banners by the ad buyers if the number of ads for a specific banner place reaches a limit set by the admin?
together with the message system that says “you cannot purchase this banner ad at this moment as there are already ads at this banner ad place”….
Better, if, at the backend, the admin can set the maximum number of banner ads that are allowed to display at one place.
Hi there,
Actually no one can directly buy the banner until they have the purchase link. So if admin send purchase link then only user can buy the banner that is the main & important way to control the banners purchasing system.
Thanks
Hi,
Thank you for your info.
1) How does the admin send the purchase link?
2) Can the admin and the buyer know which banner ad place is linked with with which purchase link?
3) Can the admin post those banner links for purchase as in wooclassify?
Hi zingyixiu,
Manage banners from wp-admin as per below image :: https://marketplace.appthemes.com/files/2015/02/screen_11.jpg
1) wp-admin >> Ads (left menu) >> Ad Opportunities Banners List
2) To send purchase link see default settings from wp-admin > Ads (left menu) >> Ad Opportunities Settings
— Even on every places while there is url and you set your url like below it will help you to display link directly :: http://www.wpwebs.com/demo/designerpress-classipress/?buy_this_ad=1
You just add “?buy_this_ad=1” for each link like home page. category pages. search page while for single Ads pages see settings/shortcode >> Purchase Banner Advertisement List Page >> http://www.wpwebs.com/demo/designerpress-classipress/purchase-banner-advertisement-list-page-ad-opportunities-plugin/
Thanks
Hi,
Classipress (4+) has the default banner place to create Header Ad (468×60) and Content Ad (336×280).
(1) How are your banners different from those default classipress banners?
(2) Will your banners replace and hide the default classipress banners in the places where those default banners are?
Thank you,